Friday, July 30, 2010

Traveling with a Toddler Part 3: Car Track

I know these blog posts on the subject are a little spaced out, bear with me. Today's toy for traveling and/or use in restaurants is perfect for any little boy (or girl) who loves those little race cars!

Take and Travel Car Garage and Track:


For this project I don't have the step by step photos, but the directions are pretty simple. I modified it from Creation Corner's carrier to make it more friendly for my little man and our needs.

This project requires- 3/8 yard for the front and back (2 pieces of 14.25"x11")
                                 - 1/8 yard for the pocket (8"x11" then folded to make it 4"x11")
                                 - 1 piece of interfacing 14.25"x11" fused to the back of one of the body pieces
                                 - 1 piece of black felt cut to make an oval race track about 9" wide
                                 - 1 elastic band
                                 - 3 small Hot Wheels/Matchbox cars
  • Cut your pocket fabric.
  • Cut your body front and back pieces. Fuse the interfacing to one piece on the wrong side of the fabric. 
  • Take that piece of fabric with interfacing on it and pin the pocket to the bottom edge of the fabric. 
  • Using a chalk pen, measure .5" and draw a line, then over 3.5" draw a line, over 3.5" draw a line, over 3.5" draw a line, then it should be .5" to the edge. 
  • Using the 3.5" lines as a guide, stitch a straight seam on the chalk lines to make 3 individual pockets for the little race cars.
  • Take the felt race track and pin it to the top of the fabric then using black thread stitch around the outer and inner sides of the track to keep it in place. 
  • Put both body pieces of fabric with right sides together and pin in place, insert an elastic band between the fabrics where the pocket is so that the band is hidden and only a little bit of edge is sticking out, pin it in place
  • Use 1/4" SA and stitch all around the edges leaving an opening about 2-3" for turning. 
  • Snip your corners, turn right side out, press with hot iron to remove wrinkles, top stitch around perimeter to close up opening and reinforce everything. 
  • Fill with small cars and give to a little one to enjoy!

Tuesday, July 27, 2010

Making your flip flops!!!

I finally wore my BLING flip flops to our morning mommy play date at the mall today. The ladies loved them!!! So here's how to make your own!!!

Supplies:
  • 1 pair of plastic flip flops. Picked mine up cheap at Old Navy.
  • Black thread and needle
  • 2 Jeweled buckles. I ordered mine from Etsy, but a friend finally found some in Michaels (if you find them and buy them there, be sure to use of their 40% coupons.)
  • 2 pieces of 1" wide ribbon cut to be 12" long
  • Scissors
  • Lighter
Step 1: Slide a long piece of thread into your needle and tie a knot at the end, then at the top of your flip flop use the end of the thread to go around the thong of the flip flop and make a knot. Then place your buckle on top of the show so the bar of the buckle is in the middle of the thong.
(You can see in the picture I am holding up the edge of where I tied a knot.)


Step 2: Using the needle and thread you want to wind it up and down through the thong and the buckle so that the thread goes above and under the bar of the buckle and secures the buckle to the middle of the thong part.

(I know these photos aren't great... it's hard to get pictures of black thread on black shoes.) Make sure your buckle is securely fastened to the plastic part of the shoe.


Step 3: Cut the needle off of the thread and use the free edge of the thread to go back up to the slack of the knot you made in step 1 and tie the two ends together to make it knot tightly. Snip the loose ends and go to your ribbon.


Step 4: Take one piece of ribbon and create a flat bow by folding the ribbon in the middle, then taking that middle part and folding it down.  You can see the fold at the top will be the center of the ribbon bow. Take your needle and thread again and sew the back section together to hold the bow in place. You don't want to sew the top piece of the ribbon down otherwise you will see the stitches through the buckle. Repeat this for both ribbon pieces.
Step 5: You now slide the ribbon under and through the buckle that is attached to the shoe.
Once the ribbon is in place and you're happy with it, cut the edges down to where you like them. I cut them at an angle. Take a lighter and careful sear the edges of the ribbon so they don't fray. Be careful not to burn your shoes!!!!

Now paint your toes a pretty color, and adorn your feet with lovely flip flops for the summer festivities!!!!

You can also interchange the ribbons to match outfits by sliding these out and slipping in new ones :) Talk about versatility!!!

LOVE THEM!!!!!

Wednesday, July 21, 2010

DIY: Making a Nursing Cover

I love this fabric!!!!! Alyson was in need of a new nursing cover and I needed to get pictures for this tutorial. So here's the adorable nursing wrap....and directions for you to make your own or one for a friend. 

These make a great baby shower present for a new mom, add a box of nursing pads and you're set!

Supplies you will need: 
1 yard of cotton fabric in the print of your choice.
18" of boning
2 D rings
Turning stick
ruler, rotary cutter and self-healing mat
sewing machine, matching thread and iron
Terry cloth fabric -optional, see SIDE NOTE

Let's get started....

1- Iron out any wrinkles in the fabric and cut your fabric to be 36" long and 24" high.

2- Then use your ruler and mark the bottom and sides of the fabric up 3/4" and draw a line.
3- Fold the raw edge of the fabric up to the line you marked and use the hot iron to press the fold.
After you have folded it once, fold the edge one more time so no raw edges are exposed and use the iron to press. Then pin the edges with straight pins.
3- Using your matching thread, stitch along the RIGHT side of the fabric with a 3/4" seam allowance so that the fold is sewn into place.

Side note: If you wanted to put an inside pocket into the cover, this is where you would do it. Cut a piece of terry cloth into a triangle and slide it into the corner edges before pinning everything into place so that the top point of the terry cloth tucks into the corner of the two sides. When you stitch the side edges it will sew into place the terry cloth fabric and create a pocket. You can also stitch a line down the middle of the pocket -sew on the RIGHT side of the fabric- and you will have a pocket for nursing pads, as well as a corner of absorbent fabric to use to wipe up baby.

4- Put aside the body of the cover for a while. Cut a piece of fabric 36" long and 2" wide. 
5- Fold the fabric in half lengthwise and use a 1/4" SA and stitch along the open edge so you make a tunnel.
6- Turn the fabric right side out with your turning stick, then press the fabric.
7- Not cut a piece of fabric 2" wide and 6" long. Fold it in half width wise then use a 1/4" SA and stitch along both side edges.
8- Turn the fabric right side out and press. Then take the D rings and slide them into the fabric, fold the fabric over and stitch along the fabric to lock the rings in place. Also, stitch along the bottom of the fabric so it doesn't fray.
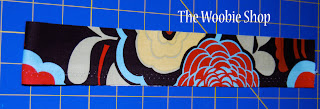
9- Take the body piece of the cover and along the raw edge at the top repeat step 2 (fold over the raw edge to the line 3/4" from the top) then instead of just folding it over again, measure from the folded side 1.25" and mark a line. Fold to this line and press.
10- Now insert the boning so that the fabric will bow out from itself. Simply slide the boning into the folded casing you just made, about center of the fabric.
Pin everything into place and stitch along the RIGHT side of the fabric. This is a little tricky because the boning is in place and can be hard to sew through, so TAKE YOUR TIME sewing this last side of the fabric.
11- Once the boning is into place securely, take the D ring attachment you made in step 8 and pin it on the right side of the cover directly next to the right edge of boning. (Place it here to keep the boning from moving around and because it's in a good location for the mother to be able to adjust the length from.) Sew a box and then an "X" mark through the middle so that you help make sure it is securely in place. Remember that this is going to get tugged and pulled on and you want it secure.

Take the strap you made in step 6 and pin it in place to the left of the boning and sew into place the way you did the D ring attachment.
12- Iron out the body of the fabric and attach the strap through the D rings.

If you are as silly as I am and don't know how to do the D rings the first time, keep going. 

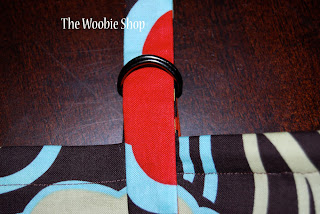
1- Slide the strap from the top down through the bottom of the D rings, keeping them both together.
2- Separate the 2 rings and pull the bottom of the strap between the 2 rings.

Friday, July 16, 2010

Making a nursing cover

I met a lovely young lady at the fountains this morning with my little guy. While one of my girlfriends was nursing she inquired as to the nursing wrap. I gave her my card and told her about the blog thinking I had posted directions on how to make a nursing cover when I posted other tutorials, and sure enough as I looked in the archives, the pictures of the nursing cover made it up in posts about baby gifts, but never the directions. :(

So if you're the lovely young mama from the fountains this morning, I will get directions up within the next week so your friend from church can put one together for you. I have to get some fabric and make one this week for a friend anyways. Or if you're another mama or sewer just looking for directions, the tutorial will be up a.s.a.p.

In the meantime, if you want to make a nursing wrap and need to know what supplies you need to buy here they are:

1 yard of a cotton fabric print of your choice
2 medium "D rings"
1/4" yard of terry cloth (if you would like a pocket inside the cover)

Tuesday, July 13, 2010

Traveling with a Toddler Part 2: Coloring on the Go

So after showing off the Dino Land Travel Mat, I thought I would keep going with "Traveling with a Toddler" series. For today we have the FOLD & GO ART WALLET. 

This art kit is great to use while in restaurants or even waiting rooms. 

Disclaimer: If you want to make one of these for your own personal enjoyment, or that of your little one, or for gifts, go ahead. If you are making these for resale, please be kind enough to give credit of the design to The Woobie Shop and to buy the pattern for commercial resale. ~ Thanks. 

Here's how to make one of your own: 
1- Cut two pieces of fabric (7" x 11.5")  to be your base layers.
Then cut two pieces of interfacing (7"x11"). One piece is fusible fleece, the other piece is a light weight interfacing. Fuse both pieces of interfacing to the wrong sides of the base fabric. 
2- Cut out a piece of coordinating fabric (7" x 8") to be your pocket for crayons. Fold the fabric in half to become 7" x 4" and line it up so the folded edge is at the top of the pocket and all raw edges are touching. Use the piece of base fabric which has the lightweight interfacing on it. 
3- Use a chalk pen and measure from the left edge .5" and mark a line, then measure 2.5" mark a line, repeat 2.5", and then repeat again.


4- Pin the fabrics together and sew along the chalk lines to make the pockets. 

5- Take a piece of coordinating fabric (5.25" x 8.5") and fold it in half so it becomes 5.25" x 4.25". Stitch with a 1/4" seam allowance along both side seams, snip the corners (see picture below), turn it out and press.


6- Place the paper pocket about 3/4" away from the right side raw edge, pin it where you want it and then stitch up both side edges to secure it in place. 


7- Take the other piece of fabric (with the fusible fleece fused to it) and place it right side up. About 1.5" from the right side sew into place the large button for closure. 


8- Now lay the fabrics together with right sides touching. You want the button on the front piece to be touching the crayon pockets of the other piece. Pin the fabrics together and insert an elastic band between the fabrics opposite of the button with a little piece of the elastic sticking out. 


9- Sew along all the sides with a 1/2" seam allowance and leave about a 2" opening so you can turn it out. Snip your corner edges, turn out the fabric, press with a hot iron to get out the wrinkles and fold over the opening. 

10- Top-stitch around the entire perimeter of the art wallet with a 1/4" seam allowance to secure the opening you had and give it a finished look. 
11- I used mini colored pencils instead of crayons, but you can fill yours with crayons, mini-twistable crayons, or mini-markers for the writing utensils. I also bought mini-notepads at Wal-Mart in a packet of 3 or 4.


Enjoy! We sure do!


Birthday Teaser

So I've been making some really cute, easy to pack with when you have to move away from me, gifts for MJD's homeboy Cayman's upcoming birthday. But since his mama is a snoop and looking at the blog to see if I'll post pictures of the gifts, I've been limited in my postings. 

In an effort to appease and tease her curiosity, I figured I'd blog about his gift bag :)

I used these super cute bags in the past for girl gift bags, but didn't want to do the same thing for K-man. Since he's having a racing themed party, I decided to applique a car on the bag like I did with one of MJD's shirts last winter.

So here you go Alyson, a peek at the bag.... but not the goodies inside :)

Craft Fair Finds

Our local cultural center had their "Christmas in July" craft fair this past weekend. Last year I worked the fair with my girlfriend Casie of "Oh, Baby! by Casie" so I never got much time to peruse and shop for myself. 

This year since I didn't work the fair, I walked through it with a friend and got to check out some of the booths. A couple of the finds we got were quite fun. One in particular was used this morning for MJD's frozen yogurt after breakfast treat. A freeze pop holder from Jelly Bean Designs. 


Isn't that a great use of felt! I was honestly a little skeptical to begin with if little man would use it or like it. He loved it! No sticky fingers, and no yelling cause it was too cold. So if MJD loves it, I know other kids will too!

Want some of your own? Check out Savannah's shop, Jelly Bean Designs. I see some of these cute treat holders making their way into Christmas stockings this year :)

Sunday, July 11, 2010

Pillowcase Dress

I love these little dress. I see them all over Etsy, and without a little girl of my own, I've never had reason to make one, until now! No, not for myself, a friend at church asked for one when I asked what her little girl would like for her first birthday :)

To be honest, I was actually quite nervous after making the dress. When you do an item for the first time, there is always so much room for improvement, but this time it had to be good. Then choice selection on fabric always comes into play, is the fabric too busy, is the pattern girlie enough, on and on. But in the end, not bad for my first time around. After receiving confirmation for a mutual friend that the pattern would suit for the little girl, I feel much better.

I see more pillowcase dress making in the future.....

Friday, July 9, 2010

Traveling with a Toddler Part 1- Dino Travel Mat


Last weekend we went on vacation with my in laws for a few days. In preparation for the 3 hour car drive and then restaurant visits, confinement in a hotel, and just the need for new entertainment on the go, I made up this Dino Travel Land.

I got the idea from another blog I had checked out. She had more of a dino mat that would be kept at home and used in a play room, and I wanted something more versatile. When I saw the dino fabric at Wal-Mart I picked up a piece to use for my appliques.

I rummaged through some fabric I already had in my stash... I took some brown cotton and a striped flannel piece which I've had forever to be my front and back. Cut them in 12x12 squares and applied some interfacing to both pieces to add some stability.
While making it, I wanted to do something to it that would make it portable and easy to carry along with us, so I decided to add a button to the flannel side and then use a ribbon and button hole to go across and fold it into fourths in order to close....

In the above picture, the button is on the left side and the ribbon is on the right.

Then I took the dinosaur fabric and cut out the dinos I wanted and placed everything onto the brown background, pinned it in place and applied stabilizer behind the fabric so I could use a tight zig-zag stitch and sew them into place to make sure they last long term. (Like you would when you applique something.)

 After everything was in place, I laid the two pieces of fabric together with right sides facing each other, sewed along all four sides, leaving about a 2" opening, snipped my corner edges and then did a top stitch along the entire perimeter to close up my opening and reinforce everything.

I added some small dinosaurs we had bought for my son at the toy store and let him get started at his own creative playtime.

I did make up a zippered pouch (not pictured here) to hold the folded play mat and dinosaurs while we're on the go.