Showing posts with label baby shower gift. Show all posts

Saturday, June 18, 2011

I Spy Baby Quilt in a Day!


This project is do able in a day if you are committed, start early in the day, not nursing a babe and have no interruptions. If that isn't your case, and you're about as ADD as I am then perhaps this will take you a couple of days....in my case two afternoons during nap time :)

I've seen I Spy Quilts in craft fairs before and spotted one I fell in love with a few years ago at the Atomic Craft Bazaar, before I had my second babe. I had no need for it at the time and wasn't about to spend $90 on a blanket.

Then came along Little Bean and I once again remembered the quilt....so I went in search of one....once again unwilling to pay so much for one and then put the desire out of mind. Until last weekend.

My sister came into town and her and my brother in law took my big boy for the weekend, my hubs was sick in bed and the little bean was asleep all day.....so I went through scraps of fabric in my closet and figured I would go for it. Worst case I threw it all in the trash.

So here's what you need:
  • One package of craft batting 
  • 8"x8" quilting square template, or you can make your own guide for cutting
  • Large cutting mat
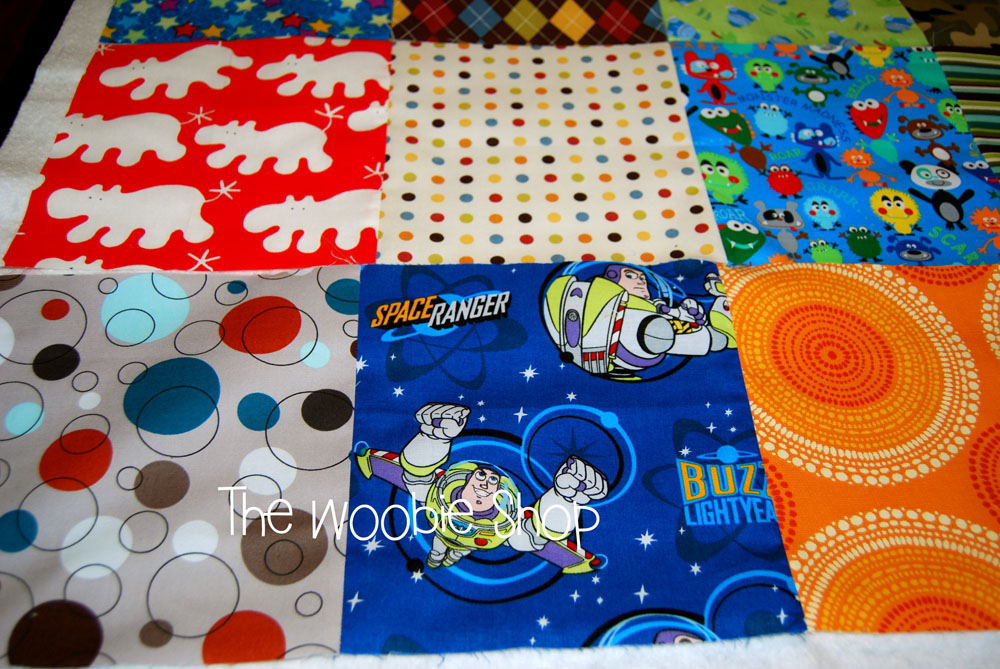
  • 20 assorted pieces of fabric with shapes, colors and patterns
  • 1 yard of fabric for the backing
  • Rotary cutter
  • Iron
  • Sewing machine
  • A TON of pins
  • More patience than Job :)
Let's begin.......
First thing I did was lay out the craft batting and use my square guide to determine how many square to cut. I went with 4 across and 5 down. Then I pulled out fabrics and laid them out on the batting.
Then I cut out the 8x8 square and ironed them flat....laid them out on the batting in the order I wanted them sewn....
Now let's start sewing......Take the first two squares in a row, line them up with right sides touching and be sure the raw edges are flush. Sew them together with a 1/2" SA. Then add the third and fourth pieces until you have the entire row sewn together.

Once you have the row sewn you want to take it to the iron and press your seams flush on the wrong side.
Here are un-pressed seams....
Here are pressed seams....
Sew each of the 5 rows across and them lay them out on the batting again....
Now you are going to repeat the same process but you will be sewing the entire rows together. Place row 1 and row 2 together with right sides touching and edges flush, pin in place if necessary and sew. Repeat this for each row until you have all the rows sewn and one big piece of fabric.
Now flip it wrong side up and press all the seams flat again.....
The TOP piece of your quilt is done!!!! Hooray! We're getting there!

Now line up your top piece with the batting on two sides, you are going to have excess on two of the sides. Pin together the top and the batting and cut off the excess batting.

Now take your backing piece of fabric and iron it out. Place the backing of the quilt right side down and then layer your batting on top and then layer your TOP quilt piece right side up. You should see both patterns on your fabric with the batting in the middle.

Here I lined up the batting and TOP piece to two edges of my backing fabric and used a gazillion of pins all over the quilt to pin everything into place. Be careful not to have wrinkles or bubbles in your fabrics. Take your time and do this slowly, it will pay off in the end.
(On quilting sites I read that many people use safety pins...I just used sewing pins and it worked okay.)


Next thing I did was test out the stitches on my machine. Some machines have a free quilting stitch and a quilting foot. Mine isn't that fancy, but I do have this fun swirl stitch so I took a piece of fabric and some batting and made a small sandwich like my big quilt and tested out the stitch....I did it with the white thread showing and then with the bobbin thread showing....I preferred the bobbin thread to show on the main part of my quilt.
So I used my craft ruler and my chalk marker and measured out 2" sections and marked them with chalk onto the backing of my quilt.
Then I used my swirl stitch and stitched down each one of those lines as my guide.
(This step was the most tedious process, and it did poke my fingers with all those pins everywhere. Now I know why safety pins were used instead!)

When the "quilting" was all done....I trimmed off the excess backing piece and I had a 97% complete quilt.....I read about bias tape, but didn't have enough fabric or patience to make my own so I stopped and went to Wal-Mart and bought 2 packages of white  Double Fold Bias Tape Quilt Binding.
Then added the binding and did an extra swirl stitch on the binding to make it all blend together.                                      
Add a baby..... 

VOILA!!!! I SPY QUILT COMPLETED :) 

Linking up on Tuesday: Tip 
Junkie handmade projects

Running with Glitter
   

Wednesday, July 21, 2010

DIY: Making a Nursing Cover

I love this fabric!!!!! Alyson was in need of a new nursing cover and I needed to get pictures for this tutorial. So here's the adorable nursing wrap....and directions for you to make your own or one for a friend. 

These make a great baby shower present for a new mom, add a box of nursing pads and you're set!

Supplies you will need: 
1 yard of cotton fabric in the print of your choice.
18" of boning
2 D rings
Turning stick
ruler, rotary cutter and self-healing mat
sewing machine, matching thread and iron
Terry cloth fabric -optional, see SIDE NOTE

Let's get started....

1- Iron out any wrinkles in the fabric and cut your fabric to be 36" long and 24" high.

2- Then use your ruler and mark the bottom and sides of the fabric up 3/4" and draw a line.
3- Fold the raw edge of the fabric up to the line you marked and use the hot iron to press the fold.
After you have folded it once, fold the edge one more time so no raw edges are exposed and use the iron to press. Then pin the edges with straight pins.
3- Using your matching thread, stitch along the RIGHT side of the fabric with a 3/4" seam allowance so that the fold is sewn into place.

Side note: If you wanted to put an inside pocket into the cover, this is where you would do it. Cut a piece of terry cloth into a triangle and slide it into the corner edges before pinning everything into place so that the top point of the terry cloth tucks into the corner of the two sides. When you stitch the side edges it will sew into place the terry cloth fabric and create a pocket. You can also stitch a line down the middle of the pocket -sew on the RIGHT side of the fabric- and you will have a pocket for nursing pads, as well as a corner of absorbent fabric to use to wipe up baby.

4- Put aside the body of the cover for a while. Cut a piece of fabric 36" long and 2" wide. 
5- Fold the fabric in half lengthwise and use a 1/4" SA and stitch along the open edge so you make a tunnel.
6- Turn the fabric right side out with your turning stick, then press the fabric.
7- Not cut a piece of fabric 2" wide and 6" long. Fold it in half width wise then use a 1/4" SA and stitch along both side edges.
8- Turn the fabric right side out and press. Then take the D rings and slide them into the fabric, fold the fabric over and stitch along the fabric to lock the rings in place. Also, stitch along the bottom of the fabric so it doesn't fray.
9- Take the body piece of the cover and along the raw edge at the top repeat step 2 (fold over the raw edge to the line 3/4" from the top) then instead of just folding it over again, measure from the folded side 1.25" and mark a line. Fold to this line and press.
10- Now insert the boning so that the fabric will bow out from itself. Simply slide the boning into the folded casing you just made, about center of the fabric.
Pin everything into place and stitch along the RIGHT side of the fabric. This is a little tricky because the boning is in place and can be hard to sew through, so TAKE YOUR TIME sewing this last side of the fabric.
11- Once the boning is into place securely, take the D ring attachment you made in step 8 and pin it on the right side of the cover directly next to the right edge of boning. (Place it here to keep the boning from moving around and because it's in a good location for the mother to be able to adjust the length from.) Sew a box and then an "X" mark through the middle so that you help make sure it is securely in place. Remember that this is going to get tugged and pulled on and you want it secure.

Take the strap you made in step 6 and pin it in place to the left of the boning and sew into place the way you did the D ring attachment.
12- Iron out the body of the fabric and attach the strap through the D rings.

If you are as silly as I am and don't know how to do the D rings the first time, keep going. 

1- Slide the strap from the top down through the bottom of the D rings, keeping them both together.
2- Separate the 2 rings and pull the bottom of the strap between the 2 rings.

Thursday, July 8, 2010

Covering a Wipes Case

I had made one of these ages ago and they were too much work to do on a continuous basis, but for Baby Bennett, I had a case laying around and some fabric that matched his blanket to finish using, so I went ahead and made one.

Here's the low down on how to do it, should you want your own. 

1- Start with a plastic wipes case. I used Huggies, because we're a Huggies family, and the fact that is all I had in my house now that we're out of diapers and using wipes. Any brand will do, you can pick one up for about $1.27 in the travel section bins at your local Wal-Mart or Target. 

2- Measure the top of your case, each of the brands and styles are a little different. Then cut 2 pieces of felt about 1/2" shorter than your case top and bottom. Then cut your fabric about .75"-1" larger than the felt. 
3- Lay the felt to the WRONG side of the fabric. Place it about center with the fabric. Now you're going to have to hold the felt and the fabric together and place it on top of the case so the RIGHT side of the fabric is facing up. Make sure you have enough fabric to go around all the edges of the case. 

4- Hold the fabric steady, and pull it up so you can hot glue the felt to the top of the case.  Once the felt is glued on, carefully apply a thin layer of glue to the side edges of the case and then fold over the fabric onto the glue. Do this to the top and bottom of the case.


Yes, you are going to have crazy raw edges, everywhere, I did say this project took time. 

5- Now here is where I stopped to add my decoration. If you don't want to add anything just skip this and go on. I took a piece of ric rac the length of my fabric and sewed on some coordinating buttons to the top. Then I hot glued it along the top of the case on top of the fabric. (You can just do a thick ribbon, the ric rac alone, or just glue buttons, whatever you want, get creative.)
6- Here comes the time consuming, tricky part. With a very sharp, small set of scissors (I used my rag quilting scissors) you are going to trim off all the excess fabric around the edges of the case. 
Yes, it won't be perfect, but we're going to glue ribbon around it to hide it, so don't worry, just be careful not to cut too much. 
7- After cutting off the excess, you are going to use hot glue and ribbon to go around the raw edges. Start in the back or on the side where it won't be to noticeable, and start in the same place for both the top and bottom pieces. 
Glue around the entire 4 sides and finish by cutting the ribbon, searing the end and gluing it on top of your starting point. 
8- Check all the sides for any loose threads or fabric that may have been missed, brush off any debris, make sure you never glued the case shut (yes, that has happened to me, hence why I'm warning you) and then fill it with baby wipes. 

Add a cute Diaper Case and you've got a great present!