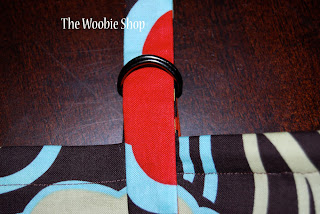
I love this fabric!!!!! Alyson was in need of a new nursing cover and I needed to get pictures for this tutorial. So here's the adorable nursing wrap....and directions for you to make your own or one for a friend.
These make a great baby shower present for a new mom, add a box of nursing pads and you're set!
Supplies you will need:
1 yard of cotton fabric in the print of your choice.
18" of boning
2 D rings
Turning stick
ruler, rotary cutter and self-healing mat
sewing machine, matching thread and iron
Terry cloth fabric -optional, see SIDE NOTE
Let's get started....
1- Iron out any wrinkles in the fabric and cut your fabric to be 36" long and 24" high.
2- Then use your ruler and mark the bottom and sides of the fabric up 3/4" and draw a line.
3- Fold the raw edge of the fabric up to the line you marked and use the hot iron to press the fold.
After you have folded it once, fold the edge one more time so no raw edges are exposed and use the iron to press. Then pin the edges with straight pins.
3- Using your matching thread, stitch along the RIGHT side of the fabric with a 3/4" seam allowance so that the fold is sewn into place.
Side note: If you wanted to put an inside pocket into the cover, this is where you would do it. Cut a piece of terry cloth into a triangle and slide it into the corner edges before pinning everything into place so that the top point of the terry cloth tucks into the corner of the two sides. When you stitch the side edges it will sew into place the terry cloth fabric and create a pocket. You can also stitch a line down the middle of the pocket -sew on the RIGHT side of the fabric- and you will have a pocket for nursing pads, as well as a corner of absorbent fabric to use to wipe up baby.
4- Put aside the body of the cover for a while. Cut a piece of fabric 36" long and 2" wide.
5- Fold the fabric in half lengthwise and use a 1/4" SA and stitch along the open edge so you make a tunnel.
6- Turn the fabric right side out with your turning stick, then press the fabric.
7- Not cut a piece of fabric 2" wide and 6" long. Fold it in half width wise then use a 1/4" SA and stitch along both side edges.
8- Turn the fabric right side out and press. Then take the D rings and slide them into the fabric, fold the fabric over and stitch along the fabric to lock the rings in place. Also, stitch along the bottom of the fabric so it doesn't fray.
9- Take the body piece of the cover and along the raw edge at the top repeat step 2 (fold over the raw edge to the line 3/4" from the top) then instead of just folding it over again, measure from the folded side 1.25" and mark a line. Fold to this line and press.
10- Now insert the boning so that the fabric will bow out from itself. Simply slide the boning into the folded casing you just made, about center of the fabric.
Pin everything into place and stitch along the RIGHT side of the fabric. This is a little tricky because the boning is in place and can be hard to sew through, so TAKE YOUR TIME sewing this last side of the fabric.
11- Once the boning is into place securely, take the D ring attachment you made in step 8 and pin it on the right side of the cover directly next to the right edge of boning. (Place it here to keep the boning from moving around and because it's in a good location for the mother to be able to adjust the length from.) Sew a box and then an "X" mark through the middle so that you help make sure it is securely in place. Remember that this is going to get tugged and pulled on and you want it secure.
Take the strap you made in step 6 and pin it in place to the left of the boning and sew into place the way you did the D ring attachment.
12- Iron out the body of the fabric and attach the strap through the D rings.
If you are as silly as I am and don't know how to do the D rings the first time, keep going.
1- Slide the strap from the top down through the bottom of the D rings, keeping them both together.
2- Separate the 2 rings and pull the bottom of the strap between the 2 rings.


 3
3


3 comments:
Great tutorial! I will have to check my instructions with yours--I like the way you describe it better! I need to make more of these--just don't have the time! Maybe I'll hire you out:) LOVE IT! And I loooooooooove that fabric too! Hope you are doing well! Lots of love, Sav
Good job lady! Just at little tip I learned: for the strap you can fold each edge under and iron them that way, then fold it in half and iron, then sew a stitch all the way down each side. Just a little easier sometimes than trying to turn the long piece right side out :)
Thanks ladies. Good tip Casie, I found that turning tool to be SUPER easy for all those strap things. At least as long as I still have the tool!
Post a Comment